

Table of Contents
Site URL: https://xrealguide.wixsite.com/unofficial - Note: Add /unofficial to the end of the site URL to access any page. Without it, you’ll get a 404 error.
Website is best viewed on a desktop using a Chromium-based browser.
Website Last Updated: 05-22-2026
Latest News: (05-21-2026) - Rumor: Possible New XREAL XBX A01 Glasses
Date Format: MM-/DD-YYYY
Quick Navigation Links:
- How to Root XREAL Beam Pro
- Fixing XREAL Beam Pro Stuck in EDL Mode
- How to Flash Global Firmware to Chinese XREAL Beam Pro & Root Guide
⚠️ IMPORTANT ⚠️
I am not responsible for any damage to your device. Rooting and/or flashing the global firmware on a Chinese XREAL Beam Pro is risky—proceed at your own risk.
Rooting the device or flashing it to the global firmware voids your warranty. The warranty DOES NOT cover rooted devices or devices that have been flashed to the global version.
This guide is for the XREAL Beam Pro only, NOT the original XREAL Beam.
What to Know Before Rooting or Unlocking the Bootloader (Check Back After Rooting for Steps)
Note #1: Rooting your device or unlocking the bootloader can cause the issues listed below. This may affect DRM streaming and banking apps. Some streaming apps may block access or updates, and banking apps are usually stricter about root detection. Because of this, the solutions below may not fix every issue. You may also need to keep modules updated from time to time to continue meeting app requirements.
Note #2: Some of these issues may also appear in the section “How to Flash Global Firmware to Chinese XREAL Beam Pro & Root Guide,” but that section may include extra details or notes specific to flashing global firmware on a Chinese XREAL Beam Pro. The issues listed here focus just on root and unlocked bootloaders in general.
-
Data Wipe:
Rooting, unlocking the bootloader, or flashing global firmware will result in a full data wipe on the XREAL Beam Pro. Be sure to back up all important data before proceeding. Once the firmware is flashed, all existing data will be permanently erased. -
Google Play “Device not certified” issue:
You can check your certification status in Google Play Store > Profile icon > Settings > About (scroll to the bottom for Play Protect certification).
If it says Device is not certified, try tapping “Fix device issue.” -
If certification still fails:
You may need to root the device and install the YuriKey Magisk module, along with any additional modules required for Strong Integrity.
Refer to the “How to get Strong Integrity?” section here:
https://github.com/Yurii0307/yurikey?tab=readme-ov-file#how-to-get-strong-integrity-
Alternative: Check out Integrity-Box from GitHub if YuriKey does not help you pass Strong Integrity.
Integrity-Box Requires:
- Tricky Store or TEE Simulator
- ReZygisk
Note: You do not need both YuriKey and Integrity-Box installed at the same time. Choose one method and install the required modules for that method. Disable or uninstall any modules you no longer need to avoid conflicts.
Warning: Rooting or lack of certification may prevent some apps (banking, streaming, etc.) from working. Compatibility is not guaranteed, and Play Integrity status should be checked at least once a month.
Note: I’ve had my XREAL Beam Pro rooted since late July 2024 and haven’t run into any issues with streaming apps, even during times when I forgot to check my Play Integrity status or keep Magisk modules fully up to date. Streaming apps have continued to play in Widevine L1 HD quality. That said, I haven’t tested any banking apps, since I don’t use banking apps on the XREAL Beam Pro. Still, it’s best to keep everything up to date to pass all checks, just in case. -
Play Integrity levels:
Google Play Integrity has three levels:
Basic Integrity, Device Integrity, and Strong Integrity.
Most apps work with Basic or Device Integrity, but some require all three.To check:
-
Open Google Play Store
-
Profile icon > Settings > About
-
Tap Play Store version multiple times to enable Developer Options
-
Go to General > Developer Options > Play Integrity > Check integrity
-
Passing all checks will show:
MEETS_BASIC_INTEGRITY, MEETS_DEVICE_INTEGRITY, MEETS_STRONG_INTEGRITY
Alternative (Easier) Way to Check Google Play Integrity:
You can use the “Play Integrity API Checker” app from the Google Play Store to quickly check your device’s integrity status
-
-
Hiding root (Recommended):
You may need to hide Magisk to prevent root detection. This can be done in Magisk settings, which renames the app, often to “Settings”, and changes the app’s package name to something unique so it’s less likely to be detected.
Find Your Build Number (XREAL Beam Pro)
Android Settings → About this device → Scroll down to "Build number"
Developer Options (XREAL Beam Pro)
Enabling developer options...XREAL
-
Android Settings>About this device>tap 7 times on "Build number"
Accessing developer options...
-
Android Settings>System>Developer options
Enabling OEM unlocking...
-
Developer options>OEM unlocking>toggle switch on right side.
Enabling USB Debugging...
-
Developer options>USB debugging>toggle switch on right side.
Patched Magisk Images (XREAL Beam Pro)
⚠️Please note that this only applies to the global variant of the XREAL Beam Pro. Chinese models may be able to use the patched Magisk files listed here by first following the How to Flash Global Firmware to Chinese XREAL Beam Pro & Root Guide section on this page.⚠️
***Please select the correct patched Magisk .img file and rename the file to "magisk.img" to make the setup process simpler.***
Build number: X4000_X495_260126_ROW (03/18/2026)
Patched Magisk.img: magisk_patched_(X4000_X495_260126_ROW).img
----------------------------------------------------------------------------------------------------
Build number: X4000_X490_251031_ROW (12/25/2025)
Patched Magisk.img: magisk_patched_(X4000_X490_251031_ROW).img
----------------------------------------------------------------------------------------------------
Build number: X4000_X486_250814_ROW (09/02/2025)
Patched Magisk.img: magisk_patched_(X4000_X486_250814_ROW).img
----------------------------------------------------------------------------------------------------
Build number: X4000_X434_250606_ROW (06/30/2025)
Patched Magisk.img: magisk_patched_(X4000_X434_250606_ROW).img
----------------------------------------------------------------------------------------------------
Build number: X4000_X364_250228_ROW (03/31/2025)
Patched Magisk.img: magisk_patched_(X4000_X364_250228_ROW).img
----------------------------------------------------------------------------------------------------
Build number: X4000_X273_2411129_ROW (12/06/2024)
Patched Magisk.img: magisk_patched_(X4000_X273_2411129_ROW).img
----------------------------------------------------------------------------------------------------
Build number: X4000_X140_240719_ROW (08/13/2024)
Patched Magisk.img: magisk_patched_(X4000_X140_240719_ROW).img
----------------------------------------------------------------------------------------------------
Build number: X400_X112_240621_ROW (07/31/2024)
Patched Magisk.img: magisk_patched_(X4000_X112_240621_ROW.img
Full OTA/Firmware Files (XREAL Beam Pro)
⚠️Please note that this only applies to the global variant of the XREAL Beam Pro. Chinese models may be able to use the firmware listed here by following the instructions in the How to Flash Global Firmware to Chinese XREAL Beam Pro & Root Guide section on this page.⚠️
-
Full OTA: Sideload this if necessary for firmware upgrade, etc.
-
Firmware Files: If you need to flash a specific .img file, etc.
Build number: X4000_X495_260126_ROW (Release Notes)
Release Date: 03/18/2026
Full OTA:
Firmware Files (Containing all .img files):
----------------------------------------------------------------------------------------------
Build number: X4000_X490_250814_ROW (Release Notes)
Release Date: 12/25/2025
Full OTA:
Firmware Files (Containing all .img files):
----------------------------------------------------------------------------------------------
Build number: X4000_X486_250814_ROW
Release Date: 09/02/2025
Full OTA: (Direct Download) | (Torrent)
Firmware Files (Containing all .img files): (Direct Download) | (Torrent)
----------------------------------------------------------------------------------------------
Build number: X4000_X434_250606_ROW (Release Notes)
Release Date: 06/30/2025
Full OTA: (Direct Download) | (Torrent)
Firmware Files (Containing all .img files): (Direct Download) | (Torrent)
----------------------------------------------------------------------------------------------
Build number: X4000_X364_250228_ROW (Security/Bug fixes)
Release Date: 03/31/2025
Full OTA: (Direct Download) | (Torrent)
Firmware Files (Containing all .img files): (Direct Download) | (Torrent)
----------------------------------------------------------------------------------------------
Build number: X4000_X273_2411129_ROW (Release Notes)
Release Date: 12/06/2024
Full OTA: (Direct Download) | (Torrent)
Firmware Files (Containing all .img files): (Direct Download) | (Torrent)
----------------------------------------------------------------------------------------------
Build number: X4000_X140_240719_ROW (Release Notes)
Release Date: 08/13/2024
Full OTA: (Direct Download) | (Torrent)
Firmware Files (Containing all .img files): (Direct Download) | (Torrent)
----------------------------------------------------------------------------------------------
Build number: X4000_X112_240621_ROW (Release Notes)
Release Date: 07/31/2024
Full OTA:
-
Not available.
Firmware Files (Containing all .img files): (Direct Download) | (Torrent)
How to Root XREAL Beam Pro:
If you prefer a full walkthrough, click here for detailed instructions.
Otherwise, you can follow the quick guide below.
Credit goes to Reddit user u/Opposite_Teach_9410 for discovering the method to root the XREAL Beam Pro and for creating the original guide linked above.
⚠️ IMPORTANT ⚠️
I am not responsible for any damage to your device. Rooting is risky — proceed at your own responsibility. Rooting VOIDS your warranty. Warranty DOES NOT cover rooted devices.
This guide is for the XREAL Beam Pro only, NOT the original XREAL Beam.
Rooting
-
Make sure you've unlocked the bootloader. Instructions above under "Unlock Bootloader."
-
Look at the top left section (desktop version of site) and download the appropriate patched magisk file for your "Build number." (Android Settings → About this device → Scroll down to "Build number")
-
Rename the patched magisk .img file to "magisk.img."
-
Place the "magisk.img" file to your platform-tools folder on your computer.
-
Install the latest Magisk APK on your XREAL Beam Pro.
-
On your computer, open Terminal/Command Prompt in platform-tools folder and type:
Opening Magisk app...
If successful booting magisk.img, open the Magisk app:
-
If you get a message saying an additional step is required, just ignore it and cancel for now.
-
Tap Install → Direct Install → Reboot. (Check images below to see install location.)
-
If prompted again with 'Additional step required' after a reboot, go ahead and accept it this time.
Updating Without Losing Root
-
Before updating to latest XREAL Beam Pro firmware, open Magisk → Uninstall → Restore Images.
-
Perform the OTA update. DO NOT reboot when XREAL Beam Pro Firmware update is complete.
-
Before rebooting your XREAL Beam Pro, open Magisk → Install → Install to Inactive Slot.
-
Now you can reboot your XREAL Beam Pro.
🎉 Congrats! Your XREAL Beam Pro is now rooted!
Unlock Bootloader ⚠️(Wipes all data)⚠️
-
Enable Developer Options.
Check top left side (desktop) "Developer Options." -
Enable USB Debugging and OEM Unlocking.
Check top left side (desktop) "Developer Options." -
Connect XREAL Beam Pro (glasses port) to PC.
-
In platform-tools folder, open Terminal/CMD and type:
-
Confirm on device. Reboot and re-enable Developer Options and USB Debugging.
adb devices
adb reboot bootloader
fastboot flashing unlock
adb reboot bootloader
fastboot boot magisk.img
Requirements
-
Computer with Internet access
-
Platform Tools (ADB/Fastboot)
-
Reliable USB cable
-
Google USB drivers (Windows)
-
Magisk APK (for XREAL Beam Pro)
Dowloads:
Check video below this page for instructions.
-
Magisk APK (for XREAL Beam Pro.)

Check "Opening Magisk app..." above
and/or "Updating Without Losing Root"
below for more info.

Check "Opening Magisk app..."
Check "Updating Without Losing Root."
List of ADB / Fastboot Commands:
-
adb devices
Lists all devices currently connected to your computer via ADB and confirms whether the device is detected properly. -
adb sideload path_to_global_full_OTA_filename.zip
Installs a firmware or update package from your computer to the device while it is in recovery mode. Replace path.zip with the actual file path. -
adb reboot bootloader
Reboots the device directly into bootloader / fastboot mode. -
adb reboot recovery
Reboots the device directly into recovery mode. From recovery, you can sideload firmware updates or wipe data / factory reset. -
fastboot flashing unlock
Unlocks the device bootloader. This will wipe all data on the device. -
fastboot flashing lock
Re-locks the device bootloader. This may also trigger a data wipe depending on firmware and device state.
How to install platform tools...
Questions or problems with rooting XREAL Beam Pro? Click here to create a post on the message boards.
Messed up rooting your XREAL Beam Pro? Stuck in EDL mode?
Thanks to Reddit user u/P17BULLZ, who found a solution and managed to fix his XREAL Beam Pro after getting stuck in EDL mode.

Note: This guide is for Windows only to keep things simple.
DISCLAIMER: Everything you do while following this guide is at your own risk. I am not responsible for any damage that may occur to your device. Please proceed carefully, verify all steps, and make sure you fully understand what you are doing before continuing.
Fixing XREAL Beam Pro Stuck in EDL Mode (Windows Only)
If your XREAL Beam Pro doesn’t boot and shows a black screen after the Android logo, it has entered Primary EDL mode.
1. Connect and verify device recognition
-
Power on your XREAL Beam Pro and connect it to your computer.
-
Open Device Manager on your Windows PC and expand Other Devices.
-
Enter Bootloader mode on your XREAL Beam Pro by pressing Power + Volume Down at the same time.
-
If you see Android with a yellow caution icon, that means the standard Google USB drivers aren’t recognizing the device properly.
2. Install alternative USB drivers
-
Disconnect or power off your XREAL Beam Pro.
-
Download and install the alternative USB drivers from the XDA Forums or Alternative Download link provided below:
- XDA Forums (latest version available for download)
- Alternative Download (may not be as recent as the above link)
3. Boot into Bootloader Mode
-
Press and hold Power + Volume Down together on the XREAL Beam Pro to enter Bootloader Mode.
-
After installing the drivers, reopen Device Manager — the device should now appear under Android Device (instead of “Other Devices”) and be listed as Android Fastboot Interface.
4. Prepare firmware files
-
Download the latest XREAL Beam Pro firmware image files (.zip) from the Firmware Files section located on the left side of this page above.
-
Unzip the folder and place it inside the same directory as your platform-tools folder.
5. Flash the firmware
-
While in Bootloader Mode, open Command Prompt in the platform-tools directory.
-
Choose one of the following flashing options:
-
Option 1: Flash each required .img file individually using Fastboot commands.
-
Option 2: Use the windows_flash_all_xreal_beam_pro.bat script (linked below the Option 2 image) to flash all .img files automatically.
-


Option #1 - Manual Flash (Safer)
Option #2 - Automated Flash (Less Controlled)

C:\Users\XREAL_Unofficial_Guide\ fastboot devices
############### fastboot
C:\Users\XREAL_Unofficial_Guide\platform-tools\FW_Files\ fastboot flash abl_a abl.img
Continue doing the fastboot flash command for the remaining .img files one by one...
Once flashing is complete, reboot your device using the command fastboot reboot . It should now start normally, and you can re-root it if desired.
C:\Users\XREAL_Unofficial_Guide\ fastboot devices
############### fastboot
C:\Users\XREAL_Unofficial_Guide\platform-tools\FW_Files\ windows_flash_all_xreal_beam_pro.bat
Once flashing is complete, you’ll be prompted to choose an action.
Type 1 to flash the firmware without wiping data, 2 to flash the firmware and perform a full wipe (factory reset), or 3 to only wipe the device without flashing.
You can re-root afterward if desired.
The actual “FW_Files” folder path referenced above may appear similar to the example below:
C:\Users\XREAL_Unofficial_Guide\platform-tools\XREAL Beam Pro - FW Files (X4000_X486_250814_ROW\(insert option #1 or option #2 file names)
fastboot flash .img files individually as needed using the commands below:
##########################FIRMWARE PARTITIONS##########################
fastboot flash abl_a abl.img
fastboot flash abl_b abl.img
fastboot flash aop_a aop.img
fastboot flash aop_b aop.img
fastboot flash aop_config_a aop_config.img
fastboot flash aop_config_b aop_config.img
fastboot flash bluetooth_a bluetooth.img
fastboot flash bluetooth_b bluetooth.img
fastboot flash boot_a boot.img
fastboot flash boot_b boot.img
fastboot flash cpucp_a cpucp.img
fastboot flash cpucp_b cpucp.img
fastboot flash devcfg_a devcfg.img
fastboot flash devcfg_b devcfg.img
fastboot flash dsp_a dsp.img
fastboot flash dsp_b dsp.img
fastboot flash dtbo_a dtbo.img
fastboot flash dtbo_b dtbo.img
fastboot flash featenabler_a featenabler.img
fastboot flash featenabler_b featenabler.img
fastboot flash hyp_a hyp.img
fastboot flash hyp_b hyp.img
fastboot flash imagefv_a imagefv.img
fastboot flash imagefv_b imagefv.img
fastboot flash keymaster_a keymaster.img
fastboot flash keymaster_b keymaster.img
fastboot flash modem_a modem.img
fastboot flash modem_b modem.img
fastboot flash qupfw_a qupfw.img
fastboot flash qupfw_b qupfw.img
fastboot flash recovery_a recovery.img
fastboot flash recovery_b recovery.img
fastboot flash shrm_a shrm.img
fastboot flash shrm_b shrm.img
fastboot flash tz_a tz.img
fastboot flash tz_b tz.img
fastboot flash uefi_a uefi.img
fastboot flash uefi_b uefi.img
fastboot flash uefisecapp_a uefisecapp.img
fastboot flash uefisecapp_b uefisecapp.img
fastboot flash vbmeta_a vbmeta.img
fastboot flash vbmeta_b vbmeta.img
fastboot flash vbmeta_system_a vbmeta_system.img
fastboot flash vbmeta_system_b vbmeta_system.img
fastboot flash vendor_boot_a vendor_boot.img
fastboot flash vendor_boot_b vendor_boot.img
fastboot flash xbl_a xbl.img
fastboot flash xbl_b xbl.img
fastboot flash xbl_config_a xbl_config.img
fastboot flash xbl_config_b xbl_config.img
fastboot flash xbl_ramdump_a xbl_ramdump.img
fastboot flash xbl_ramdump_b xbl_ramdump.img
fastboot flash qweslicstore_a qweslicstore.img
fastboot flash qweslicstore_b qweslicstore.img
###########################DYNAMIC PARTITIONS###########################
fastboot flash system_b system.img
fastboot flash product_b product.img
fastboot flash vendor_b vendor.img
fastboot flash odm_b odm.img
fastboot flash system_ext_b system_ext.img
fastboot flash vendor_dlkm_b vendor_dlkm.img
File: windows_flash_all_xreal_beam_pro.bat
Steps:
-
Download the windows_flash_all_xreal_beam_pro.bat file (from the link above).
-
Place it in the folder containing the XREAL Beam Pro firmware files you downloaded earlier and moved into the platform-tools directory.
-
Open Command Prompt in the platform-tools directory.
-
In Command Prompt, type the full folder path followed by windows_flash_all_xreal_beam_pro.bat for the location where you placed the firmware files inside the platform-tools folder, as shown in the example in the image above.
How to Flash Global Firmware to Chinese XREAL Beam Pro & Root Guide
(Making the Chinese XREAL Beam Pro function like the global version)
Credit goes to Reddit users u/Fit_Werewolf_7846 and u/Otherwise_Chemist369 for taking the risk of flashing the global firmware onto the Chinese XREAL Beam Pro. Additional credit goes to u/Opposite_Teach_9410 for discovering the method to root the XREAL Beam Pro and for creating the original rooting guide.
Note: This guide is based on information shared by the users mentioned above, along with some additional information I knew or came across. Most of the details related to flashing global firmware on the Chinese XREAL Beam Pro come from u/Otherwise_Chemist369. I do not own a Chinese XREAL Beam Pro myself, so I have not personally tested this process. If you run into issues, I may not be able to help. Please proceed at your own risk.
⚠️ IMPORTANT ⚠️
I am not responsible for any damage to your device. Rooting and/or flashing the global firmware on a Chinese XREAL Beam Pro is risky—proceed at your own risk.
Rooting the device or flashing it to the global firmware voids your warranty. The warranty DOES NOT cover rooted devices or devices that have been flashed to the global version.
This guide is for the XREAL Beam Pro only, NOT the original XREAL Beam.
Important notes, issues, and warnings before starting (PLEASE READ)
Check back after rooting or flashing global firmware on your Chinese XREAL Beam Pro
Note: Rooting your device, unlocking the bootloader, or flashing a different firmware (such as a custom ROM or a global version on a Chinese model) can cause the issues listed below. This may affect DRM streaming and banking apps. Some streaming apps may block access or updates, and banking apps are usually stricter about root detection. Because of this, the solutions below may not fix every issue. You may also need to keep modules updated from time to time to continue meeting app requirements.
-
Data Wipe:
Rooting, unlocking the bootloader, or flashing global firmware will result in a full data wipe on the XREAL Beam Pro. Be sure to back up all important data before proceeding. Once the firmware is flashed, all existing data will be permanently erased. -
Unlocking Bootloader May Be Required:
Flashing global firmware may require an unlocked bootloader. Reddit user u/Otherwise_Chemist369 reported that they were able to flash global firmware on the XREAL Beam Pro with an unlocked bootloader and no root. They also mentioned that they relocked the bootloader afterward, but weren’t sure if having it unlocked was the reason the flash worked. A knowledgeable contact believes the unlocked bootloader was likely the reason flashing global firmware on the Chinese XREAL Beam Pro succeeded.
If you want to test flashing global firmware without unlocking the bootloader, feel free to give it a try and share your results on the message boards. -
Bootloop risk:
After flashing global firmware, you may encounter a bootloop where the device continuously reboots. A factory reset / full data wipe may be required to restore normal operation. -
Google certification (required):
Once global firmware is installed, you must register your XREAL Beam Pro on Google’s uncertified device registration page, then log into your XREAL account via Android settings.Note #1: According to Reddit user u/Fit_Werewolf_7846, this was a necessary step to properly install and run apps through the Google Play Store. Reddit user u/Otherwise_Chemist369 also reported that a warning message would pop up every few seconds saying the device was uncertified. Registering the device with Google stopped the constant warnings.
Note #2: Google certification can take 6 or more hours to complete, so the status may not update immediately. -
Google Play “Device not certified” issue:
You can check your certification status in Google Play Store > Profile icon > Settings > About (scroll to the bottom for Play Protect certification).
If it says Device is not certified, try tapping “Fix device issue.”
Note: Reddit user u/Otherwise_Chemist369 mentioned that registering the device with Google stopped the constant warning messages, but did not fix the “Device is not certified” status shown in the Google Play Store settings. Fixing that issue may require rooting the XREAL Beam Pro. He chose to leave the device as is, and after about a month, reported that he was using it daily as his main media device for the glasses, with Widevine L1 working in Netflix. -
If certification still fails:You may need to root the device and install the YuriKey Magisk module, along with any additional modules required for Strong Integrity.
Refer to the “How to get Strong Integrity?” section here:
https://github.com/Yurii0307/yurikey?tab=readme-ov-file#how-to-get-strong-integrity-
Alternative: Check out Integrity-Box from GitHub if YuriKey does not help you pass Strong Integrity.
Integrity-Box Requires:
- Tricky Store or TEE Simulator
- ReZygisk
Note: You do not need both YuriKey and Integrity-Box installed at the same time. Choose one method and install the required modules for that method. Disable or uninstall any modules you no longer need to avoid conflicts.Warning: Rooting or lack of certification may prevent some apps (banking, streaming, etc.) from working. Compatibility is not guaranteed, and Play Integrity status should be checked at least once a month.
Note: I’ve had my XREAL Beam Pro rooted since late July 2024 and haven’t run into any issues with streaming apps, even during times when I forgot to check my Play Integrity status or keep Magisk modules fully up to date. Streaming apps have continued to play in Widevine L1 HD quality. That said, I haven’t tested any banking apps, since I don’t use banking apps on the XREAL Beam Pro. Still, it’s best to keep everything up to date to pass all checks, just in case. -
Play Integrity levels:
Google Play Integrity has three levels:
Basic Integrity, Device Integrity, and Strong Integrity.
Most apps work with Basic or Device Integrity, but some require all three.To check:
-
Open Google Play Store
-
Profile icon > Settings > About
-
Tap Play Store version multiple times to enable Developer Options
-
Go to General > Developer Options > Play Integrity > Check integrity
-
Passing all checks will show:
MEETS_BASIC_INTEGRITY, MEETS_DEVICE_INTEGRITY, MEETS_STRONG_INTEGRITY
Alternative (Easier) Way to Check Google Play Integrity:
You can use the “Play Integrity API Checker” app from the Google Play Store to quickly check your device’s integrity status
-
-
Hiding root (Recommended):
You may need to hide Magisk to prevent root detection. This can be done in Magisk settings, which renames the app, often to “Settings”, and changes the app’s package name to something unique so it’s less likely to be detected. -
Ethernet detection issue (glasses):
Note: Reddit user u/Fit_Werewolf_7846 mentioned that they needed to disable TCP/IP from the glasses’ OSD to launch nebulaOS and ensure network-based apps work properly, as the glasses were detecting and overriding the Wi-Fi connection. According to them, this may be because they have both Chinese and global firmware versions installed. I haven’t run into this issue myself with my global version of the XREAL Beam Pro.
To disable this:-
Go to Other (5th navigation icon) on the glasses on-screen display (OSD)
-
Scroll to page 3
-
Highlight Serial Number
-
Press and hold the Mode button to open the Developer page
-
Disable TCP/IP
Note: TCP/IP may need to be enabled to access nebulaOS on the XREAL Beam Pro and to perform firmware updates on the glasses.
-
-
Final note:
There may be additional issues when flashing global firmware onto a Chinese model that are not yet documented. Proceed at your own risk.
Requirements
-
Computer with Internet access
-
Platform Tools (ADB/Fastboot)
-
Reliable USB cable
-
Google USB drivers (Windows)
-
Magisk APK (for XREAL Beam Pro)
Dowloads:
Check video on the right side for instructions.
-
Magisk APK (for XREAL Beam Pro.)
Find Your Build Number (XREAL Beam Pro)
Android Settings → About this device → Scroll down to "Build number"
Developer Options (XREAL Beam Pro)
Enabling developer options...XREAL
-
Android Settings>About this device>tap 7 times on "Build number"
Accessing developer options...
-
Android Settings>System>Developer options
Enabling OEM unlocking...
-
Developer options>OEM unlocking>toggle switch on right side.
Enabling USB Debugging...
-
Developer options>USB debugging>toggle switch on right side.
Unlock Bootloader ⚠️(Wipes all data)⚠️
-
Enable Developer Options.
Check above under section "Developer Options." -
Enable USB Debugging and OEM Unlocking.
Check above under section "Developer Options." -
Connect XREAL Beam Pro (glasses port) to PC.
-
In platform-tools folder, open Terminal/CMD and type:
-
Confirm on device. Reboot and re-enable Developer Options and USB Debugging.
adb devices
adb reboot bootloader
fastboot flashing unlock
List of ADB / Fastboot Commands:
-
adb devices
Lists all devices currently connected to your computer via ADB and confirms whether the device is detected properly. -
adb sideload path_to_global_full_OTA_filename.zip
Installs a firmware or update package from your computer to the device while it is in recovery mode. Replace path.zip with the actual file path. -
adb reboot bootloader
Reboots the device directly into bootloader / fastboot mode. -
adb reboot recovery
Reboots the device directly into recovery mode. From recovery, you can sideload firmware updates or wipe data / factory reset. -
fastboot flashing unlock
Unlocks the device bootloader. This will wipe all data on the device. -
fastboot flashing lock
Re-locks the device bootloader. This may also trigger a data wipe depending on firmware and device state.
Patched Magisk Images (XREAL Beam Pro)
***Please select the correct patched Magisk .img file and rename the file to "magisk.img" to make the setup process simpler.***
**************************************Global Version**************************************
Build number: X4000_X495_260126_ROW (03/18/2026)
Patched Magisk.img: magisk_patched_(X4000_X495_260126_ROW).img
Full OTA/Firmware Files (XREAL Beam Pro)
-
Full OTA: Sideload this if necessary for firmware upgrade, etc.
-
Firmware Files: If you need to flash a specific .img file, etc.
**************************************Global Version**************************************
Build number: X4000_X495_260126_ROW (Release Notes)
Release Date: 03/18/2026
Full OTA:
Firmware Files (Containing all .img files):
*************************************Chinese Version*************************************
Note: Chinese firmware version may not be the latest release. I obtained this version from another user, so newer versions may exist.
Build number: X4000_X486_250814_PRC
Release Date: Unknown
Full OTA:
Firmware Files (Containing all .img files):
How to install platform tools...
Steps to Flash Global Firmware on a Chinese XREAL Beam Pro
Note #1: These steps will likely require unlocking the bootloader to flash global firmware. You can try flashing without unlocking it first to see if it works. If not, continue with the steps below. You’ll also need to have Android platform-tools set up, as shown in the video above.
Note #2: All ADB commands should be run with the XREAL Beam Pro connected via the glasses port (USB debugging enabled through Developer Options) or via wireless debugging if you know how to set it up. You can run these commands in Command Prompt, PowerShell, or Terminal.
-
Download the latest available global full OTA from the left side under the section
“Full OTA/Firmware Files (XREAL Beam Pro).” -
Transfer the global full OTA .zip file to an easy-to-remember folder, such as your platform-tools folder.
-
Boot your XREAL Beam Pro into recovery mode.
There are two ways to do this (Choose 1 or 2, not both. Then proceed to step 4.):-
Connect the glasses port of the XREAL Beam Pro to your PC and run the commands:
(Requires platform-tools to be set up—see the embedded YouTube video above for instructions.)
-
Power off the device, then press and hold Power + Volume Up for a few seconds until it goes past the XREAL logo. Wait a moment, and the recovery mode options should appear.
-
-
Use the volume keys to navigate to “Apply update from ADB” and confirm with the power button.
-
On your PC, run the following command in Command Prompt or Terminal:
adb sideload path_to_global_full_OTA_filename.zip
Replace path_to_global_full_OTA_filename.zip with the actual file path and filename of the global Full OTA ZIP.
Wait for the global full OTA to finish flashing. -
You may run into a bootloop if you don’t factory reset after flashing the global OTA.
If this happens:-
Power off the device
-
Boot back into recovery mode (Power + Volume Up)
-
Select “Wipe data/factory reset.”
-
-
After the reset, the XREAL Beam Pro should boot normally without the bootloop issue.
adb devices
adb reboot recovery
Step #1: Open Android settings on your XREAL Beam Pro to login to or sign up for XREAL Account.
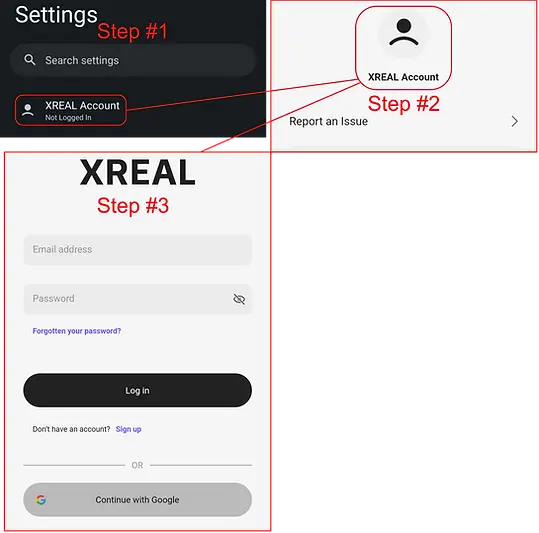
These steps are required for your XREAL Beam Pro to become Google Play certified:
-
Log in to your XREAL account through the Android settings on the XREAL Beam Pro.
-
Register your XREAL Beam Pro on Google’s uncertified device registration page.
Note: Google certification may take 6+ hours to complete. -
Refer to the red section at the very top of this guide under “Important notes, issues, and warnings before starting (PLEASE READ)” for details on fixing Google certification issues, Google Play Integrity levels, and other potential problems you may encounter.

Step #4
Step #5: This may require installing several Magisk modules (root required) to resolve these issues.
Note: Refer to the guide below for instructions on how to root the XREAL Beam Pro.
Rooting
-
Make sure you've unlocked the bootloader. Instructions above under
"Unlock Bootloader." -
Look at the above left section (desktop version of site) and download the appropriate patched magisk file for your "Build number."
(Android Settings → About this device → Scroll down to "Build number") -
Rename the patched magisk .img file to "magisk.img."
-
Place the "magisk.img" file to your platform-tools folder on your computer.
-
Install the latest Magisk APK on your XREAL Beam Pro.
-
On your computer, open Terminal/Command Prompt in platform-tools folder and type:
adb reboot bootloader
fastboot boot magisk.img
Opening Magisk app...
If successful booting magisk.img, open the Magisk app:
-
If you get a message saying an additional step is required, just ignore it and cancel for now.
-
Tap Install → Direct Install → Reboot.
(Check images below to see install location.) -
If prompted again with 'Additional step required' after a reboot, go ahead and accept it this time.
Check "Opening Magisk app..." above
and/or "Updating Without Losing Root"
below for more info.
Check "Opening Magisk app..."
Check "Updating Without Losing Root."
Updating Without Losing Root
-
Before updating to latest XREAL Beam Pro firmware, open Magisk → Uninstall → Restore Images.
-
Perform the OTA update. DO NOT reboot when XREAL Beam Pro Firmware update is complete.
-
Before rebooting your XREAL Beam Pro, open Magisk → Install → Install to Inactive Slot.
-
Now you can reboot your XREAL Beam Pro.
If You Run Into Any Issues
-
You can flash individual firmware files or sideload the full OTA for either the Chinese or global version. These can be found on the left side of this guide under the section “Full OTA/Firmware Files (XREAL Beam Pro)”.
-
The Chinese firmware may not always be the latest, since I don’t own a Chinese XREAL Beam Pro.
-
The global firmware is more likely to have the latest version available, as I do own the global XREAL Beam Pro.
-
-
Check out the guide “Fixing XREAL Beam Pro Stuck in EDL Mode (Windows Only)” above on this page if your XREAL Beam Pro ever gets stuck in EDL mode.
-
You may also try contacting one of the people credited at the top of this guide if you need help.
Please be respectful and avoid spamming or harassing them.
🎉 Congrats! Your Chinese XREAL Beam Pro is now running the global version or is successfully rooted!